![]() FAQ
FAQ
How to recognize SAN MARCO taps
How to prepare for installation
HOW TO RECOGNIZE SAN MARCO TAPS
Tubular screw down spout and solid brass body
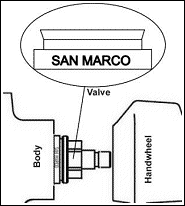
Each valve is marked with "SAN MARCO"
|Top|

|Top|
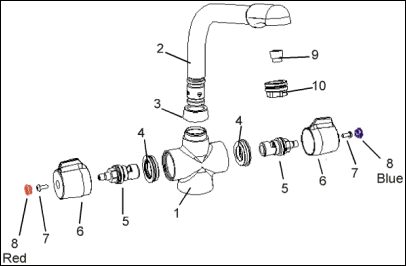
| N° | Item | Material |
| 1 | Body | Solid Brass hot forged |
| 2 | Spout | Tubular spout made of brass & copper tubes |
| 3 | Spout collar | Brass |
| 4 | Valve bush | Brass |
| 5 | Valves | Ceramic Disc valve or Compresssion valve |
| 6 | Handwheel | ABS or Metallic handle |
| 7 | Handwheel screw | Brass |
| 8 | Hot / cold Indice | Plastic |
| 9 | Anti-splash | Special Plastic |
| 10 | Anti-splash washer | Rubber |
|Top|
HOW TO PREPARE FOR INSTALLATION
First shut off your cold and hot supply and water heating system. Then with your mains stop cock closed, open the lowest hot and cold taps in the house and allow to run until the cold storage tank and pipes are empty (the hot water storage cylinder always remains full).
|Top|
Attention
Before installing the new mixer it is essential that you thoroughly FLUSH through the supply pipes in order to remove any remaining swarf, solder or other impurities.
Failure to carry out this simple procedure could cause problems or damage to the workings of the mixer.

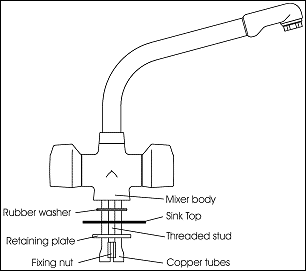
- First screw the threaded stud into the mixer body.
- Screw the copper tubes into the mixer body, and fully tighten.
- Place the sink mixer in position to see if any alteration to the existing supply pipe-work is necessary.
- After making any necessary alteration to the pipe-work, pass the rubber washer over the copper tubes and threaded stud to form a seal on sink top.
- Pass the copper tubes and fixing stud through the sink with the spout retaining screw to the rear.
- Slide the retaining plate up the copper tubes and secure screwing the fixing nut finger tight.
- Check that the mixer body is correctly positioned and fully tighten the fixing nut.
- The copper tubes at this stage will need to be gently turned outwards, then supported approximately halfway down and turned inwards, making two pipes parallel again but further apart thus making room for the couplings to be fitted.
- It is recommended that 15mm x 15mm compression fitting should be used and/or, where required, 15x15mm compression check valves to connect mixer to hot and cold supply. Hot water should be connected to the left when viewed from the front.
|Top|
Attention
Before installing the new mixer it is essential that you thoroughly flush through the supply pipes in order to remove any remaining swarf, solder or other impurities.
Failure to carry out this simple procedure could cause problems or damage to the workings of the mixer.
- Having first checked all new connections, turn on the mains stop cock, close all taps except the new mixer and as the system start to refill check for leaks.
- Once you have satisfied yourself that there are no leaks, switch on the hot and cold water supply and water heating.
|Top|
To clean, wipe with a soft soapy sponge, then rinse and wipe dry. Do not use abrasive cleaners, scouring pads, powders of wire wool to clean the tap or let paint stripper or chemical desalting agents come into contact with it.
If you live in a hard water area, lime scale may build up around the spout of your tap. Clean this off with either vinegar (acetic acid) or lemon juice.
Do not attempt to remove this with a knife or any other sharp element, as this will damage the surface finish.
|Top|
| EFFECTS | CAUSES | CURE |
| Dripping
tap: Water dripping from the end of the spout when the tap is turned off. |
New compression taps take a few days for the rubber washer to "be bed down". If after a few days the dripping continues, the seating and/or the rubber washer have been damaged by debris in the plumbing system. | Please
order a new compression valve, and flush the system. Installation |
| Dripping
tap: (2) Water dripping from the end of the spout when the tap is turned off. |
High pressure in your plumbing system. | Check the pressure in your system: if it is too high, more than 5 bar, it could be necessary to use a pressure reducer, contact our after sails service. |
| Tap leaks at the joint of the body & spout | The spout "O" rings have been damaged during installation. | It
needs new rubber "O" rings. Installation |
| Tap leaks under the work-top | -
The tap tails have not been screwed in tight enough. - The plumbing installation may be suspect. |
Tighten the tap tails without damaging or deforming the plumbing. |
| Tap leaks by the handles | The valve may need tightening or replacing. | Tighten
the valve or order a new compression valve. If a valve bush is present, order a new set of valve and valve-bush. |
| Water outlet is clogged with stain deposit or impurities | Debris introduced during local water authority construction and refurbishment or in the water have clogged the antisplash. | Unscrew the antisplash and clean it. |
|Top|
Installation of new valve:
- Turn off the hot & cold water supply under the sink unit.
- Remove the little indice (i.e. blue/red or C/H).
- Unscrew the handle screw and remove the handle.
- Unscrew and remove the damaged valve.
- Clean the surface of contact of the valve gasket.
- Screw in and tighten the new valve and re-assemble in reverse order.
Installation of new spout "O" rings:
- Turn off the hot & cold water supply under the sink unit.
- Unscrew the spout collar by hand.
- Pull the spout out of the body of the tap.
- Remove the two black "O" rings.
- Fit new greased "O" rings.
- Gently push the spout into the body.
- Screw the spout collar, hand tight.
- Turn on the hot & cold water.
San Marco mixers have been manufactured to a high standard, this guarantees the workmanship and quality of materials of San Marco products subject to the following conditions:
- The product should be installed by a qualified register plumber and operated in a normal domestic environment in the United Kingdom.
- It does not cover accidental damage, abnormal local water conditions, misuse, or lack of proper care and maintenance in accordance with guidelines.
- Proof of purchase is required to validate a claim under the guarantee.
- The guarantee is limited to the cost of replacement of the components and not to any associated labour costs.
- The guarantee does not affect the purchaser's statutory rights.
- Our guarantee is as follows, conditional on the above points, 1 years on finishing, Oring and mechanical parts (i.e. valves).
|Top|

